Guys, how cool are chevron quilt patterns?
I mean, they make anything look classier and fancier and yet, they can be so easy to make!
Particularly when we’re talking about sewing.
I’ve tried many ways to create fabric chevrons over the years but I do believe this is the easiest and most fun way to make them.
Let me show you!
Sewing a Chevron Quilt Pattern
I think you’ll be very surprised to know how simple it is to create a chevron quilt pattern.
We’re talking strips in a width of your choice, enough to cover the entire area we’re trying to cover.
And a center fabric square, or diamond, to start things off with.
You’ll want to add strips to both sides of that square, until the square is much bigger and covering the entire width of the surface you want to cover.
Then things get even easier because all you need to do is keep adding side strips until the entire space is covered!
How to Start a Chevron Quilt Pattern
I think you’ll be very surprised to know how simple it is to create a chevron quilt pattern.
There are a lot of ways to create a chevron pattern, some more complicated than others.
The easiest version, which is our of course, need a little assistance from a fabric square that we’ll place right in the middle of our base.
Then we pick one fabric and add it to one side of the square.
Then, we use the same fabric to cover the side next to it which will also be covering the first strip we added.
And that’s you’re very first chevron.
No 45º mitered corners, just plain overlapping with awesome results!
Mrs. Quilty Subscription Box
Today I received some very exciting mail.
It was a subscription box sent by Mrs. Quilty. They have beautiful quilting kits, fabric, patterns and templates for quilters of all levels.
They had asked if they could send me a box and I said YES because I’ve wanted to try one for sooo long!
I don’t have subscription services where I live, but I love this idea of getting surprise fabric in the mail.
It’s like Christmas every month!

Inside the cutest colorful box came a magazine with a couple of projects, a couple of cute gifts and 2 bundles of springy, flowery fat quarters (8 for each bundle) of soft, colorful, cute fabric.
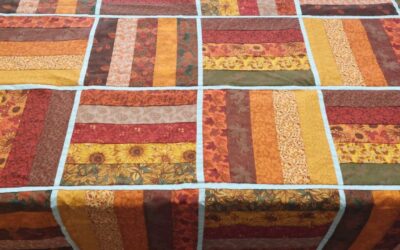
And that’s the fabric I’ll be using for this chevron table runner.
And if you’d like to start receiving your very own Mrs. Quilty subscription boxes in the mail, there’s a limited-time offer available to all quilt lovers.
Get 30% OFF on your first Mrs. Quilty subscription box using the discount code: SANDY30.
Chevron Table Runner: The Perfect Sewing Project for the Beginner Quilter
Now, why is this Chevron table runner the best sewing project for anyone who’s just starting out?
Well, for one thing, we’ll just be adding strips on top of strips: It really is that simple.
Also, we’re doing this chevron quilt pattern using fat quarters, which makes our life so much simpler!
We’ll be doing some self binding to save us the time and trouble of making bias tapes and whatnot.
Last but certainly not least, this is a Quilt as You Go project, meaning we’re sewing the top while quilting the whole thing and skipping so many complicated steps!
I mean, what could be better??
Chevron Table Runner Supplies
For this free pattern, you’ll need:
- Several strips of colorful fabric
- Back fabric (preferably white)
- 100% Cotton batting
- Rotary Cutter
- Rotary Blade
- 24” x 6” Quilting Ruler
- Cutting Mat
- Mini Iron
- Ironing Wool Pad
- Quilting clips
- Basic Sewing supplies: Pins, safety pins, needles and thread
- Any regular foot
Disclosure: some links are affiliate links. As an Amazon associate, I earn from qualifying purchases, at no extra cost to you.
Chevron Table Runner Requirements
- 24 1.5 inch strips of fabric in contrasting colors
- 13 x 21 inch thermal adhesive
- 12 x 20 inch batting
Step 1: Cut the batting

Because this is a chevron quilt as you go, we need to get your batting ready beforehand.
I’m using 100% cotton batting but you can use whatever you have on hand.
I’m cutting a 12 by 20 inch rectangle and I’m dotting the center of the rectangle vertically and horizontally to make sure we start exactly at the center.
And also, to make sure our chevron points are resting in the middle of the batting.
Step 2: Cut the backing fabric

And I also want to add my backing fabric, I want a complete quilt sandwich as I quilt my top.
I doesn’t have to be this way, you can totally do Quilt as You Go using only the top and the batting, but I love looking at the beautiful pattern in the back once we’re finished.
I wanted a white fabric to contrast with all the colors I’m using for my top chevron stripes.
But I also fell in love with this cute lemon fabric and really wanted to see all those lemons popping out when it’s time for the self binding.
Step 3: Cut the fabric strips

And then, of course, we need our chevron strips.
Because I’m using the fabric that came in the Mrs. Quilty subscription box, I’ve got 8 different fabrics that were originally fat quarters.
If my calculations are correct, if I cut 3 strips out of each fabric, I should have more than enough for my chevron table runner.
You can either rip your fabric to cut the strips or use a rotary cutter, for this project, either way will work.
Step 4: Place the fabric square in the middle of the batting rectangle

And now we start creating our chevron pattern.
We do that by placing a 4 inch fabric square in the middle of our rectangle (remember the markings?)
Let’s go ahead and pin it to make sure it won’t move.
Step 5: Start adding the fabric strips

Because our next step is to start adding our fabric strips to create our chevron quilt pattern.
A lot of you have asked me what angle should a chevron pattern be.
And the answer is 45 degrees.
Although, if we’re being completely thorough, this isn’t a chevron, it’s a herringbone pattern, the difference being chevron fabric strips meet in the center with a mitered 45º angle.
In a herringbone pattern one fabric strip just overlaps the other, which is exactly what we’re doing, in order to make it even more simple.
And the herringbone pattern has a 90º angle, which is what we’ve got here, we’re creating the pattern around the center square, right?
Step 6: Add fabric strips to both sides

So what we need to do here is pick a fabric, add one strip next to one of the fabric square sides.
Then we add another strip of the same fabric to the other side of the fabric square, covering the first strip we added and creating our chevron pattern that way.
Next step is doing the exact same thing with a different fabric on the other two sides of our rectangle.
Then we go back to our first two sides and add more fabric, placing it next to the first chevron.
We keep doing this until our center diamond is big enough to cover the entire width of our rectangle.
Step 7: Add strips to the sides of the center diamond

Once our center diamond is complete, we can now work on one side at a time, just adding strips.
At some point get smaller and smaller until we cover the entire rectangle with strips.
In terms of the fabrics I chose, I wanted to make sure that I combined color with white fabrics, so I don’t get two white fabrics together.
I want contrast and for each strip to pop!
Step 8: Complete the quilt

As you sew each strip through all the layers of our quilt sandwich, you’re quilting as you go.
That means that by the time you’ve covered the entire rectangle (And I do mean the whole thing, up to the tinniest corner strips), if you turn your chevron table topper around, you’ll see the quilt pattern you used to make this chevron quilt.
And, let me tell you, it will look absolutely beautiful!
Step 9: Trim off the excess

Now by the time you’re finished, you should have loads of extra fabrics popping out of your batting rectangle.
Just turn your chevron quilt backwards, fold the backing fabric and pin it to make sure it’s not in the way of the excess fabric and just cut the tiny fabric strips off.
Do it for the complete 4 sides of our rectangle, being extra careful not to cut into your backing fabric!
Step 10: Complete the self binding

Now that our chevron quilt pattern is complete, it’s time to bind the whole thing.
And, as promised, we’re self binding.
What that means is we take the back fabric and we fold it over our top twice.
Once to hide the raw edged and the other to make our thin binding.
Then we use our quilting clips to keep them in place, we miter those corners and we sew as close to the inside edge of the binding as we possibly can.
Step 11: And that’s it!

And here we have it, our chevron table runner is ready to go!
How colorful we this?
And how wonderful are these fabrics provided by the Mrs. Quilty subscription box?
Watch the full tutorial!
And that’s it guys, your new favorite quilt pattern for beginners!
Fun to make and so easy! And look how those fabrics pop!
If you want to watch the video of this quilt getting made, here it is!
Most Recent Projects
Incredibly Easy Stained Glass Quilt Pattern for Beginners
Today I’m making a stained glass quilt top. But...
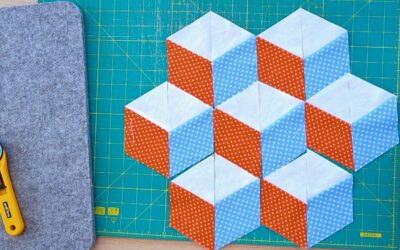
How to Make 3D Tumbling Quilt Blocks (No Y-Seams)
Today we’re a making tumbling blocks! And that...
5 Practical Ways to Use Ugly Fabrics
Today I’m making a quilt using only ugly fabric....

About Me
I am a content creator, designer and maker of quilts and a hopeless cat lady. Being able to share all I know with you is a kind of magic I have never experienced before!
love your enthusiasm, can’t wait to try the Mrs. Quilty box.
Thank you!