Guys, we’re going old school today, I’m so excited to do this, we’re going to have so much fun together!
Today we’re going to make a Tetris quilt pattern.
Do you remember Tetris? If I were to count the hours I spent playing tetris in my life, it would probably amount to a couple of years…
But anyway, we’re creating some Tetris inspired blocks today using a technique I know you guys love that is so easy, so quick to make that anyone can do it.
And then, before we’re done, we’ll make an awesome gift out of it.
Are you ready to play? Let’s go!
How to Sew a Tetris Quilt Pattern
So, first thing you need to know is, in order to build our tetrominoes, our Tetris pieces, we’ll be using our scraps.
I mean, we’re using 1.5 inch squares.
How perfect is that for using tiny scraps of leftover fabric from our pile?
We’ll also be using a thermal adhesive as a base for our puzzle quilt pattern because we want to make sure all the tiny squares stay put as we decide where they should be in our quilt pattern.
Because I haven’t thought of a pattern before doing this, I will be trying several options out.
And so should you!
Play with it a little, try different combinations, see what works for you!
Finally, we finish the whole thing off with a zigzag stitch that covers all sins and adds much needed drama to the whole thing!
Tetris lovers, are you with me? Let’s do this!
Why the Tetris Quilt is the Perfect Quilt Pattern?
I truly cannot believe I had never thought of making a Tetris quilt pattern, I mean, it’s the perfect pattern for a quilt, if you think about it!
It’s made out of tiny blocks, tiny squares of fabric, the ultimate patchwork project, right?
It’s very colorful and the contrasts are awesome, which is right down my alley.
Colorful and bright? Yes, please!
It’s made out of tiny pieces, so it’s a scrappy project, which are my absolute favorites!

It’s a lot of fun to make! You know how much I love the puzzle part of quilting right?
Well, putting all the pieces in place is the ultimate puzzle quilt pattern as far as I’m concerned, it’s so much fun!
It’s also easy peasy, lemon squeazy, beginners and experts alike will absolutely love to make it!
And… come on… it’s Tetris! Enough said, right?
Let’s Make it Simple: Tetris Quilt Pattern for Beginners
Now, doing a Tetris quilt pattern may sound intimidating, but it really is one of the simplest things you’ll ever do!
Even if you’re a beginner and have never sewn a stitch in your life, you’ll be able to do this.
It really is a fast easy quilt to make.
Because the way we’re making this quilt, we’re just going to glue fabric squares together, next to each other, then we’ll sew them in place and that’s pretty much that!
Also, there is a nifty little trick to make sure that any imperfections are completely hidden from the eye.
It just doesn’t get any easier than this!
Tetris Quilt Supplies
- Several scraps of colorful fabric
- White fabric to serve as the back fabric
- 100% Cotton batting
- Thermal adhesive
- Temporary glue pen
- Rotary Cutter
- Rotary Blade
- 12” x 6” Quilting Ruler
- Cutting Mat
- Mini Iron
- Ironing Wool Pad
- Quilting clips
- Basic Sewing supplies: Pins, safety pins, needles and thread
- Any regular foot
Disclosure: some links are affiliate links. As an Amazon associate, I earn from qualifying purchases, at no extra cost to you.
Tetris Quilt Requirements
- 66 1.5 inch black squares
- 12 1.5 inch red squares
- 12 1.5 inch green squares
- 12 1.5 inch yellow squares
- 12 1.5 inch orange squares
- 12 1.5 inch purple squares
- 12 1.5 inch light blue squares
- 12 1.5 inch dark blue squares
- 17 x 24.5 inch white fabric
- 15 x 22.5 inch thermal adhesive
- 16 x 23.5 inch batting
Step 1: Choosing the fabric scraps

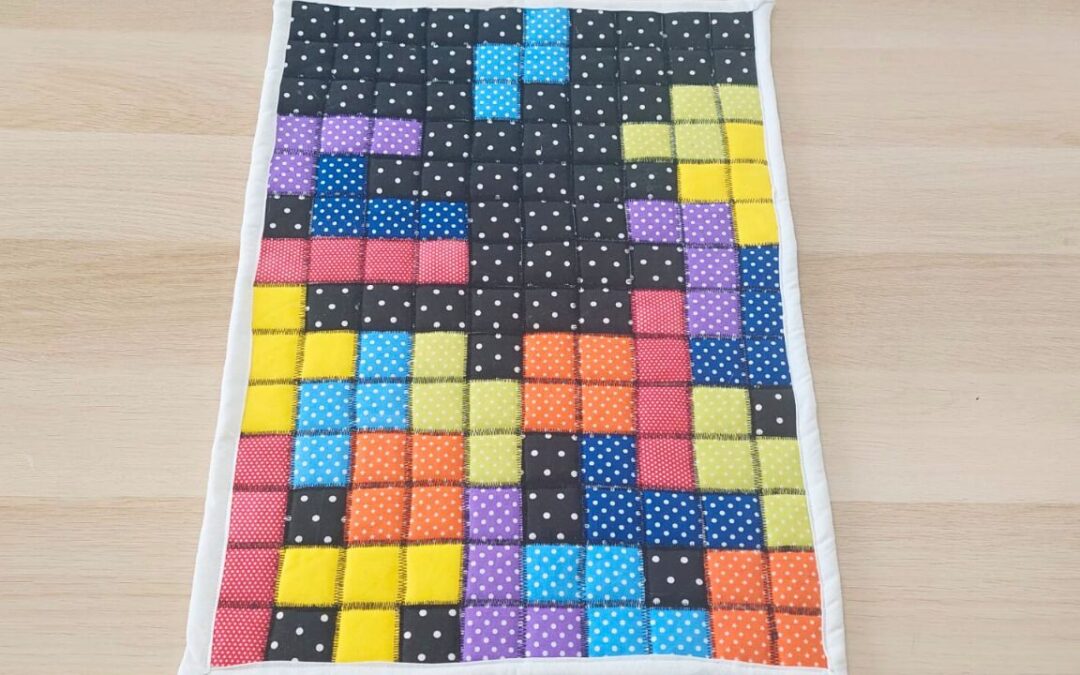
Okay, for this Tetris inspired quilt we will need 8 different color fabrics.
And there are all kinds of Tetris versions, but I wanted to make the classical one.
So black for the background, polka dots in this case.
As for our tetrominoes, here’s my pick: purple for L, red for I, yellow for T, green for S, light blue for Z, orange for the square and dark blue for the J.
I dabbled with the idea of using patterns, but ended up keeping it simple not to overwhelm the eye once it’s all finished.
So I recommend either solids or really simple fabrics like polka dots or little stars.
Step 2: Cutting the fabric squares

Now we want to cut 1.5 inch squares for all our colors.
We know that each Tetris piece is 4 blocks and I want to use 3 of each, so we’ll need 12 squares for each color and 66 black squares.
We want to cut our squares as perfectly as we possibly can because we will be laying them out next to each other. We want them to fit perfectly side by side.
However if you can’t do that, don’t worry! Even if the squares aren’t siding up perfectly, we’ll be able to hide it with our large zig zag stitch.
Step 3: Adding the thermal adhesive base

Now we need a base for all our squares. I use a thermal adhesive, usually Heat n’bond, for that effect.
We want to be able to press all the squares in place once we’re done with our pattern because we don’t want them to move an inch while we’re quilting the whole thing.
We want to cut a 15 by 22.5 inch rectangle.
Then we want to tape it onto a large surface so it doesn’t curl up.
Step 4: Adding the squares

And now add all our 150 squares to our base.
We use a temporary glue pen for this but go ahead and use anything you want that allows you to stick those squares in place but also to be able to remove them if you want to change something in the pattern.
Because I’m using some very light fabrics, I’m using a yellow glue pen.
Step 5: Building the Tetris quilt pattern

Okay guys, time for our Tetris puzzle quilt pattern.
We need to lay out all our squares, forming all the Tetris pieces in their respective colors.
An important detail to consider: in the game, when a row is filled with pieces, that row disappears and the whole game goes lower.
That means that, in order to show off all the pieces, we need to add at least one black square to each row to justify them being there.
At the top, I’ve added one falling piece and surrounded it in black squares.
Step 6: Pressing the squares in place

Next step is pressing all our squares in place.
This is a definitive step, so make sure you’re happy with your tetris quilt top layout.
By pressing the squares, we activate the adhesive.
Also, don’t iron the squares, just press them because if you move the iron around you will shift the squares and distort the adhesive, ruining the whole effect.
Step 7: Adding the batting

It’s time to add our batting. I’m using 100% batting but you can use whatever you prefer.
I’ve cut a 16 by 23.5 inch rectangle. I want to make it longer than our quilt top to make sure that when I bind I don’t go over the edge squares too much.
We remove the backing of our thermal adhesive, place our tetris quilt top on the center of the batting and press it in place, binding the quilt top and the batting together.
Step 8: Adding the backing fabric

Our Tetris quilt-along is well on the way and it’s time to add our backing fabric.
I’ve chosen white solid fabric because most Tetris game versions have a white or a gray frame around the black background and that’s what we’re trying to recreate here.
Now, this is a 17 by 24.5 inch rectangle.
We made it larger than the previous layers because we want to self bind.
Step 9: Quilting the Tetris pattern

Now it’s time to quilt our very unique, very wonderful tetris quilt.
And we’re using a large zig zag stitch in a black thread.
We do this for two reasons: because we want to add a 3d effect to our blocks and because we want to hide any imperfections, like the white spaces between our squares.
The black stitch gives it a very dramatic feel that I absolutely love!
You could, however, sew each piece in it’s original colors, if you prefer. Personally, I don’t think it’s needed, even though it would look stunning.
Step 10: Self binding

Now that our tetris quilt is nice and quilted, all that’s missing is the binding.
And we’re doing a self binding. That means we’re taking the extra fabric from the back and we’re folding it to the front in order to make the binding.
We fold it twice, once to hide the hard edges and another to make it the right size and we fold it over our edge squares, making sure not to cover too much or them.
Then we use our quilting clips to keep the fabric in place until we’re ready to sew.
And don’t forget about those mitered corners for a clean, crisp look.
Step 11: Sewing the binding

And now we sew our binding in place, I’m using white thread.
I’m sewing as close to the edge as possible and you could hand bind your quilt, that would hide the stitch and look perfect.
Step 12: And that’s it!

And here we have it guys! Our Tetris quilt is ready to go.
How stunning does it look?
I’m obssessed! It’s one of the prettiest things I’ve ever done!
Watch the full tutorial!
And that’s it guys, the most perfect Tetris quilt pattern you will ever see.
Fun to make and so easy any beginner will be able to make it.
If you want to watch the video of this quilt getting made, here it is!
Most Recent Projects
Incredibly Easy Stained Glass Quilt Pattern for Beginners
Today I’m making a stained glass quilt top. But...
How to Make 3D Tumbling Quilt Blocks (No Y-Seams)
Today we’re a making tumbling blocks! And that...

5 Practical Ways to Use Ugly Fabrics
Today I’m making a quilt using only ugly fabric....

About Me
I am a content creator, designer and maker of quilts and a hopeless cat lady. Being able to share all I know with you is a kind of magic I have never experienced before!