If I’m honest, there was a time when it would sound impossible for me to know how to sew perfect circles because I just couldn’t wrap my mind around it.
Since then, I have found a couple of ways to do it perfectly every time!
Can I Cut Fabric Circles With a Rotary Cutter?
So I guess before we know how to sew perfect circles we need to be able to cut perfect circles, right?
And many of you have asked me how to cut a fabric circle using a rotary cutter.
It’s not a very straight answer, honestly.

Yes, you can use a rotary cutter to cut fabric circles but you’ll need a round ruler for that.
Also, it’s not the easiest or the quickest way to do it.
I always cut my fabric circles using a scissor, sometimes a teeny tiny one to get perfect control of those curves.
Why is it So Hard to Sew a Perfect Circle Quilt Block?
So why do we find it so incredibly challenging to sew a perfect fabric circle?
It’s easy enough to figure our, just try placing your circle on top of the circumference of the quilt block onto which you want to sew your circle to realize that… they’re pointing in completely different directions.
Meaning the circle has one direction for its circumference and the quilt block has a totally different direction for theirs.
And the only way to actually sew a fabric circle in these conditions is to force the fabrics into place… without twisting the fabric too much…
Yeah… not the easiest thing to sew, I’ll give you that…
How to Sew Fabrics into Perfect Circles Fast
We’re all very busy people.
No matter what we’ve got going on in our lives, we don’t really want to waste too much time doing something when we can do it quicker, right?
In this tutorial I’ll show you how to sew perfect circles for quilts in less than 5 minutes.
I would say maybe even in less than 3 minutes!
It all depends on the level of detail you want for your circle quilt blocks, but it can be done!
Sew Fabric Circles: 5 Ways for Sewing Perfect Circles Every Time
Luckily, we don’t have to sew our perfect circle quilt patterns the traditional way, there are several approaches to the circle quilt block that make our lives much easier!
Also, there are some tools and supplies that will helps us make that happen.
And I’m pretty sure I’ve managed to compile the 5 easiest ways to sew a circle quilt block on this post!
Yes, I also make the traditional version, but I’m still sharing a couple of tips and tricks to make it simpler.
Let me show you!
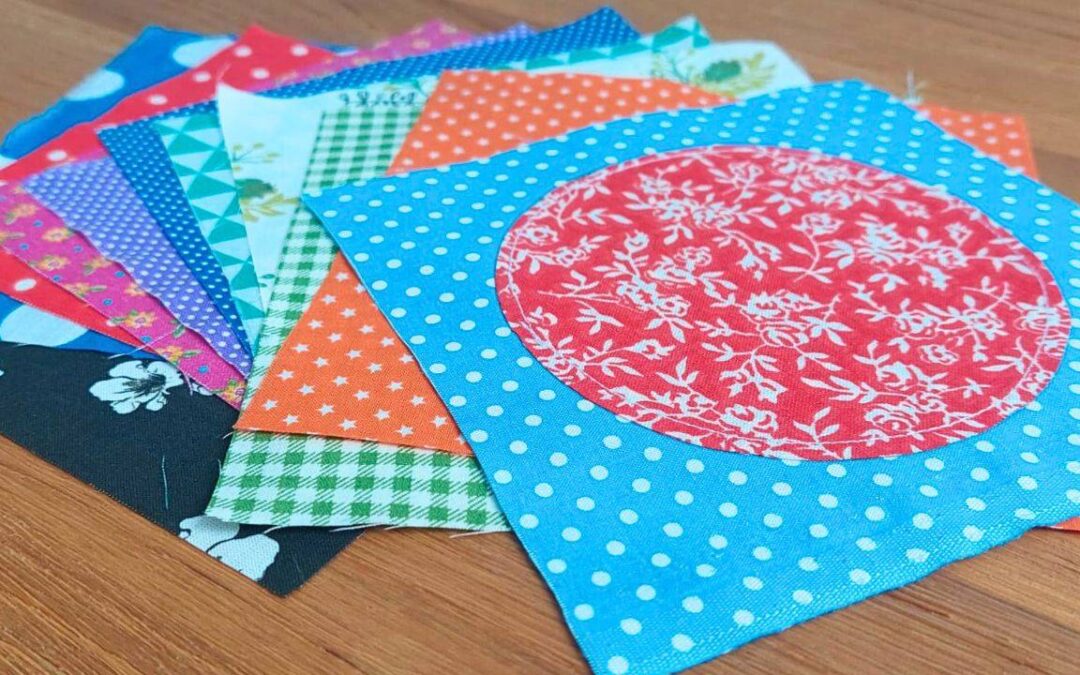
Circle Quilt Block Supplies
- Several pieces of colorful fabric
- Rotary Cutter
- Rotary Blade
- Scissor
- 6” x 6” Quilting Ruler
- Cutting Mat
- Mini Iron
- Ironing Wool Wad
- Basic Sewing supplies: Pins, needles and thread
- ¼ on an inch foot (sewing machine)
- Thermal Adhesive
- Paper Templates
- Temporary Glue Pen
Disclosure: some links are affiliate links. As an Amazon associate, I earn from qualifying purchases, at no extra cost to you.
Raw Edged Circle Quilt Block Requirements
For our first circle quilt block, we’ll need.
- 1 6″ fabric square
- 1 5″ fabric square in a different color
- 1 5″ thermal adhesive square
Step 1: Cut the fabric

Cut a 6 inch fabric square in one color and a 5 inch fabric square in another color.
Then, using the smallest circle template, draw a circle into the 5 inch square and cut it.
Step 2: Add the thermal adhesive

Then, using your iron, press the fabric circle onto the thermal adhesive circle, fusing the two together.
Step 3: Adding the circle to the quilt block

Remove the backing of the thermal adhesive and use the iron to press the circle onto the quilt block.
In order to do this, you need to fold the circle AND the square into 4 in order to find the middle.
Step 4: Sew the circle

You can leave your circle quilt block as is or, if you want to make sure it’s durable, you can sew it into place.
In order to do this, you can use a straight stitch, a zigzag stitch or an appliqué stitch.
You can also hand sew it to hide your stitches.
Step 5: The raw edged circle quilt block is ready!

And that’s our first perfect circle quilt block complete!
It’s the easiest and quickest one of the bunch.
It’s also the only one with raw edges so, if that doesn’t work for you, you’ll love our other options.
Folded Edge Circle Quilt Block Requirements
- For our second circle quilt block, we’ll need.
- 1 6″ fabric square
- 1 5″ fabric square in a different color
- 1 5″ cheap fabric (I’m using curtain)
Step 1: Cut the fabrics

Just like we did for the first version, we take a 6 inch fabric square and a 5 inch fabric square.
We take the smaller circle template and we draw and cut a circle using the 5 inch fabric square.
Step 2: Add the second fabric

Next, we take the cheapest fabric we have available and, for me, that’s this old curtain I have lying around.
We place it over my circle, right sides together, and sew it using a 1/4 inch foot.
Next step is cutting the extra fabric off.
Step 3: Cut and fold the seam allowance

Okay guys, next step is making small cuts into our seam allowance, then folding the seam allowance into our circle, ironing it in place.
Then, we make a cut in the backing fabric that’s big enough to fit our fingers.
Step 4: Turn the circle inside out

Then we turn our circle inside out carefully.
Now, this is probably the most troublesome step because we need to make sure that we turn the circle inside out perfectly.
I used the back of a painting brush to help the fabric stick out.
Step 5: Add the circle to the quilt block

Once you’re happy your circle is nice and round, it’s time to place it in the middle of our block.
In order to find the middle or the square and the middle of the circle, we fold it in 4 and mark it to find the center.
Then we place our circle in place and pin it.
Step 6: Sew the circle onto the quilt block

Now we want to sew our circle in place, making sure to sew as close to the circle’s outer edge as possible.
Step 7: Cut the backing fabric

You can leave your perfect circle quilt block as is, but I don’t really like the fabric bulk in the middle.
So I’m just going to cut our the two back layers of fabric inside the circle.
That means the square fabric and the curtain fabric are cut out.
Be careful to leave a big enough seam allowance to make sure your circle won’t rip.
Step 8: The folded edge circle quilt block is ready!

And we’re done!
This is how to sew a perfect circle quilt block folding the edged in.
How much fun was that?
Seam Allowance Circle Quilt Block Requirements
For our third circle quilt block, we’ll need.
- 1 6″ fabric square
- 1 5″ fabric square in a different color
Step 1: Cutting the fabric

This is the perfect version for those who want to sew perfect circle quilt blocks without any noticeable stitching on top!
So we need to cut a 6 inch fabric square and a 5 inch fabric square.
This time we’re using the larger circle template to cut our circle, which is essentially the same size as the first plus a 1/4 inch seam allowance.
Step 2: Drawing the seam allowance

To prepare the fabric square for this circle quilt block version we need to get our two square templates, one with a seam allowance and one without.
We start by tracing the template with the seam allowance first, to find the middle of our square.
Next we use the template without the seam allowance to trace our fabric square.
Step 3: Cutting the seam allowance

We cut the center circle in our fabric square, following the smaller circle (The one we traced using the template with the seam allowance)
Next we add small cuts to the seam allowance.
Step 4: Gluing the seam allowance

Now we want to fold our seam allowance into the white square.
So we get our temporary glue pen, add some glue to the back of the seam allowance and then fold each bit over the square.
Step 5: Gluing the circle to the quilt block

After that, we add more glue to the part of the seam allowance that was left exposed when we folded it over the square.
We want to use a fair amount of glue because we need it to hand in there for the next steps.
Then we add our circle, the right side of the circle facing the glue.
Essentially we’ve been creating a window in the white square for our circle to shine.
Step 6: Releasing the seam allowance

The simplest way to sew our circle quilt block would be to add a straight seam all around the circle, catching the two fabric layers.
But we don’t want any stitched showing for this one, so we’re just going to patiently and carefully unglue the seam allowance from the white square.
So we separate the seam allowance from the square, not the circle!
We want the seam to stick to the circle the best it possibly can.
Reinforce with more glue if necessary.
Step 7: Sew the circle onto the quilt block

Next step is to carefully sew the seam allowance onto the circle at the back of the white square.
We want to make sure the stitches are completely hidden but we also want to make sure the circle is nice and secure.
Step 8: The seam allowance circle quilt block is done!

And there we have it!
An awesome circle quilt block, no stitches in sight!
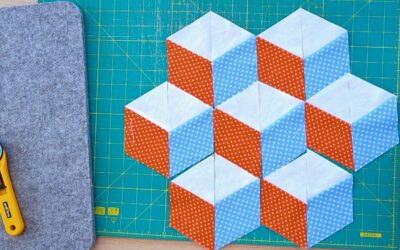
Wonky Circle Quilt Block Requirements
For our wonky circle quilt block, we’ll need.
- 4 4″ fabric squares
Step 1: Pile the 4 fabric squares

Okay guys, this is the only way I know to cut circle quilt blocks with a rotary cutter, without a circle ruler.
And it’s actually a pretty fun way to sew a circle of fabric.
We start by overlapping 4 squares of 4 inch fabrics in different colors.
Step 2: Make 2 round cuts

Keep in mind that this is meant to be a wonky circle quilt block so don’t feel nervous about this next step.
We’re going to make to circular cuts to our 4 fabrics, all at once.
If it makes you feel better, turn the fabric, exposing the back of the fabric and draw 2 perfect circular lines.
And then try and keep within those lines because we’re just going to go ahead an make those two cuts.
Step 3: Assemble the wonky quilt block

All there’s left for us to do is to combine all the 4 fabrics into what is probably, the funnest, most wonky circle quilt block you’ll ever see!
Make sure that for every corner of this quilt block you use all the 4 fabrics, that is the best way to combine them.
How cute is that?
Traditional Circle Quilt Block Requirements
For our final circle quilt block, we’ll need.
- 4 3″ fabric square
- 4 3″ fabric square in a different color
Step 1: Cut the fabric

Making a traditional circle quilt block means making one quarter at a time, just like we did with the wonky circle quilt block.
We take our two remaining templates, the square quarter and the circle quarter, both with seam allowance and we cut our two different fabrics.
When we’re done, we’ll want two pieces of each fabric. Two quarter circles and two quarter squares.
Step 2: Mark your pieces

The first tip I have for making sewing perfect circle quilt blocks the traditional way is to mark our fabric to make sure we’re on the right track as we sew.
We fold the fabrics in half and mark that spot.
Then we fold one quarter in and mark it, as well as the 3 quarter mark.
Step 3: Sew the circle quarters and the square quarters together

Now this is the second and, possibly, the most important tip I have for you.
You need to find the way to sew these two pieces that works for you.
Some people like to pin every inch of the two fabric pieces so that all there’s left to do after is to sew.
Personally, I prefer not to pin any part of these pieces and just move the fabric as we reach the different marks on the fabric.
I just adjust the fabric as I go.
That allows me to see what I’m doing and to move the fabric into place in small steps.
My advice is to try both ways and find out which is better for you.
Step 4: Sew the corners together

Now that we have 4 corners perfectly sewn, it’s time to assemble our quilt block.
This is an important part because now is when we find out if our hard work paid off.
If we did it all correctly, the seams will match perfectly and we’ll get a perfect circle quilt block.
If not, it’s a second version of the wonky circle quilt block but a circle quilt block nonetheless.
So let’s just go ahead and match those seams and sew our corners, 2 at a time.
Step 5: Sew the 2 halves together

So far so good!
Time to line those center seams and sew the two parts together into one glorious, perfect circle quilt block!.
Pin the seams in place, if needed.
Step 6: Trim the quilt block

This is going great guys!
All there’s left for us to do is to trim the square to make it a perfect circle quilt block.
Step 7: The traditional circle quilt block is done!

And here we have it!
A perfect traditional circle quilt block with all those seams aligned and those circumferences perfectly matching.
We did it!
The easy way…
Watch the full tutorial!
I had a blast making all these versions of the circle quilt block for you guys!
And if you want to watch the video of these quilt blocks getting made, here it is!
Circle Quilt Block Templates


Most Recent Projects
Incredibly Easy Stained Glass Quilt Pattern for Beginners
Today I’m making a stained glass quilt top. But...
How to Make 3D Tumbling Quilt Blocks (No Y-Seams)
Today we’re a making tumbling blocks! And that...

5 Practical Ways to Use Ugly Fabrics
Today I’m making a quilt using only ugly fabric....

About Me
I am a content creator, designer and maker of quilts and a hopeless cat lady. Being able to share all I know with you is a kind of magic I have never experienced before!