Wondering what to do with small fabric scraps?
I often feel like the more scraps I use in my projects, the more scraps I create! It’s like I’m stuck in a loop of leftover fabric that never ends! And the worst part is the scraps I get from these projects are even smaller than the original ones!
They’re fabric crumbs at this point…
Well, I have found the perfect way to use up tiny leftover scraps. You’re going to love it!
How to Use Small Fabric Scraps
Today I’m going to share the perfect project for using small fabric scraps WITHOUT creating more scraps.
I’m taking all my scraps and turning it into a piece of fabric. Scrappy, colorful fabric, how perfect is that?
But it gets better! I’ll also be adding a top layer that will turn a bunch of leftover fabric into something completely new!
And then, before we’re done, I’ll do something super cute with it, a small fabric basket for my scraps of leftover fabric. Something I’ll be using every single day!
This is the funnest sewing project for beginners I’ve ever done! It’s a quick and easy tutorial anyone will be able to follow, regardless of their experience sewing.
Things You Can Do Using Tiny Leftover Scraps
Dealing with leftover fabrics is annoying and time consuming. But I’m determined to reduce the waste I create with my sewing.
More and more I see each tiny piece in my scrap stash as precious and valuable.
That’s why I keep looking for more scrap fabric ideas I can share with you guys.
And now I’ve made it my mission to show you how to use every last piece of your scraps. To make sure you don’t throw away fabric scraps ever again.

Creating unique projects using leftover fabric is also a lot of fun! Because it’s unpredictable, you never really know how it’s going to look in the end.
And the more I look, the more I realize there are AMAZING things to do with small pieces of fabric. Sewing projects that are easy, quick to make, colorful and very very satisfying.
You can even recycle old clothes you have lying around, by cutting it into scraps before putting them to good use.
Sewing Idea for Small Fabric Scraps: Fabric Basket!
For this project we’ll need to get our leftover fabric stash. Maybe for you that’s a bag (very respectful) or a box or maybe it’s a full on, jumbo-size container, it does not matter!
We need those small scraps, the tinier the better.
Why? because we want loads of scraps to make beautiful contrasts when all huddled together. And since we don’t have a big piece to spread them, the tinier they are, the more we can add.
Also, You can make this any size you want ok? The process is exactly the same.
I want to use scraps that have some kind of meaning to me, you know, that remind me of quilts or projects that I loved making whenever I look at it.
Scrappy Basket Supplies
- Several scraps of colorful fabric
- Sheer fabric or net (I used an old curtain)
- Colorful fabric for the inside of the basket
- 100% cotton batting
- Heat n’ Bond (the red one)
- Sewline temporary glue pen
- Rotary Cutter
- Rotary Blade
- 12” x 6” Quilting Ruler
- Cutting Mat
- Mini Iron
- Ironing Wool Pad
- Basic Sewing supplies: Pins, safety pins, needles and thread
- Any regular foot (sewing machine)
Disclosure: some links are affiliate links. As an Amazon associate, I earn from qualifying purchases, at no extra cost to you.
Scrappy Basket Requirements
1st Layer:
- 15×10 inches of thermal adhesive
- scraps to cover the whole area
2nd Layer:
- 15×10 inches of 100% cotton batting
3rd Layer (top):
- 15×10 inches of sheer fabric (I used an old curtain)
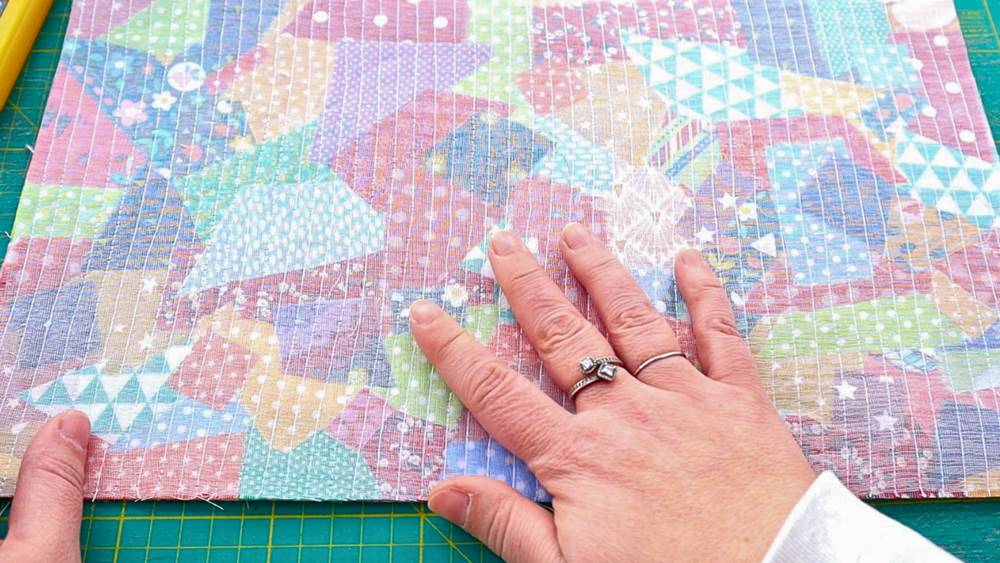
Because I used a somewhat opaque white top layer of sheer fabric, I want my scraps to be as colorful as I possibly can to create contrast.
4th Layer (inside fabric):
- 15×10 inches of colorful fabric for the inside of the basket
Step 1: Sorting the fabric

So my goal here is to use my scraps to create new fabric, right? So my first step is to get a handful of scraps directly from my scrap pile.
This is the part where we spend a little time sorting through our scraps to find the fabric pieces we need.
I try to find colors that contrast nicely with each other, preferably smaller pieces but I can cut a scrap into any size I want.
However, since the point is zero waste, to be able to use all my fabric scraps, I try not to do that.
I know I’ll need much more scraps than just a handfull but I want to start small so I don’t get overwhelmed by having scraps all over my tiny sewing space.
Step 2: Cutting the thermal adehesive

Now we want to cut our thermal adhesive into a 15 by 10 inch rectangle.
This is the basis of our scrappy layer, we can’t settle all our scraps perfectly without a surface they’ll get stuck on.
If you don’t want to use the thermal adhesive you can use a temporary glue pen or stick or a temporary adhesive spray, if you prefer.
However, having this rectangle as template helps us know exactly the surface we need to fill with scraps, making our lives so much easier…
So, if you’re not using this adhesive, pick a fabric or even a piece of paper to guide you.
Step 3: Laying out the scraps

Now we start laying out our scraps.
We want to cover the whole rectangle, making sure there is no white adhesive in sight once we’re done.
Make sure the colors are strong and contrasting with the fabric scraps that are sitting next to each other.
This is our chance to use every last piece of your scraps.
And, as far as creative ways to use leftover fabric scraps, this really is the best I’ve seen!
Step 4: Pressing our fabric scraps in place
")
Now we need to press all our scraps into place and make sure they won’t move again.
Make sure there are no open spaces to prevent getting adhesive into your iron. Do a quick check before pressing your tiny scraps and fill any gaps you find.
Don’t forget to press the fabric without ironing it around in order not to bend the fabric out of shape.
Step 5: Adding extra crumbs

Now it’s time to go extra small with your crumbs.
Look at your scrappy rectangle and search for parts where the scraps are taking up a large area. Because we want contrast and to mix it all up, for every large scrap we want to add a tiny fabric scrap to break up that pattern.
And because there is no longer any adehesive to hold the fabric crumbs in their place, I’m using a temporary glue pen to stick them in place.
Step 6: Presssing the fabric scrap top onto the batting

Next step is getting our 10 by 15 inch rectangle of 100% cotton batting. I’m using some leftover batting but you can use interfacing or anything that will help our basket keep its shape.
And because the thermal adhesive we pressed our scraps onto is double sided, we need to remove the protective paper from the adhesive and press the whole thing onto our batting.
And just like that we’re ready for our top layer!
Step 7: Adding the top layer

And here comes the bride!
It’s time to add the sheer fabric or netting. There are 3 purposes for doing this.
First, the scraps will lay flat, no ends sticking out.
Second, it makes it easier to sew in place because the scraps won’t move or lift, they’re all trapped under the sheer fabric.
Third, by adding this sheer but not totally transparent layer, you’re muting the colors and all the scraps kind of blend together into one unique surface.
Step 8: Binding our layers

The only way you’ll be able to keep these 3 layers as they are is by stitching the whole thing.
But, in order to feed the 3 layers through the sewing machine without them shifting, we need to pin it all in place.
You won’t need many pins, just enough to keep all of it, the scraps, the batting and the sheer fabric, still.
Step 9: Let’s quilt!

The pattern is completely up to you. You can do free motion quilting, always a favorite of mine, you can sew diamonds that always look so classy or you can sew some very simple, straight lines.
Which is exactly what I’ll be doing! I’m sewing straight, tight lines to make sure this is a very sturdy basket.
And if you decide to sew straight lines like me, keep in mind we’re sewing them from one side to the other of the narrower side of our rectangle. So more lines, but shorter. This is because we want our lines to be horizontal on our final basket.
If you sew your lines along the wider side of our rectangle, you’ll get vertical lines on the end basket.
Step 10: Trimming our rectangle

And that’s how we get our 10 by 15 inch fabric rectangle.
Made from the tiniest bits of scraps from our pile of leftover fabric.
It really doesn’t get much simples than this.
Time to make a fabric basket!
Step 11: Sewing the basket sides

We start by taking our rectangle and folding it in half, right sides together.
We fold the longest part into two and that way our lines are horizontal.
And then we sew both sides of our folded fabric.
Step 12: Cutting the corners off

Now we mark one inch on each side of the bottom of our folded fabric.
And by this I mean, the part where we have our fold, mark a 1 inch square on the left and the right.
Next, we cut both marked squares off with a scissor, preferably. I know we’ve just sew these sides, but we can chop these corners off without a problem.
Step 13: Sewing both corners shut

Now we fold our square corner gap into a straight line and sew it shut.
Then repeat for the other corner.
And the exterior for our basket is complete, even though it is still inside out.
Step 14: Repeat steps 11 to 13

Our next step is preparing the inside fabric for our basket. I’ve picked this soft but cute pink with little stars. We repat all the steps we took with the exterior fabric.
That means we have folded our fabric in half and then we sew both sides.
Then we cut 1 inch of the corners for the bottom of our folded fabric.
And then we sew both corners shut. All of this should mean we have two similar pieces, one for the exterior and one for the interior.
Step 15: Join both pieces

Now we joing both pieces, placing the pink fabric inside our scrap sandwich, right sides together.
Then we pin all the fabrics together.
Step 16: Sew the basket together

Now we are going to sew our basket top togehter, still inside out.
But we won’t sew all the way around the basket, we need to leave a large enough gap to be able to turn the basket inside out.
Step 17: Turn the basket inside out

Once you’re done, you should have the scrappy top facing outwards and the pink fabric inside.
Step 18: Sew the gap shut

Now that we’ve turned our basket into it’s right position, we need to close the gap we used to turn it inside out.
You can do this by hand or using your sewing machine.
But we also need to add a seam all around the top of out basket to keep the inside and outside fabrics from shifting. We want the rim of the basket to be perfectly defined.
Step 19: Fold the top of the basket

Our fabric basket many out of tiny leftover fabric scraps is complete!
All there’s left to do, and this is optional of course, is to add a fold to the top to show off the cute inside fabric.
Watch the full tutorial!
And that’s it guys, the cutest ever fabric basket made from tiny leftover fabric scraps.
If you want to watch the video of this quilt top getting made, here it is!
Most Recent Projects
Incredibly Easy Stained Glass Quilt Pattern for Beginners
Today I’m making a stained glass quilt top. But...
How to Make 3D Tumbling Quilt Blocks (No Y-Seams)
Today we’re a making tumbling blocks! And that...

5 Practical Ways to Use Ugly Fabrics
Today I’m making a quilt using only ugly fabric....

About Me
I am a content creator, designer and maker of quilts and a hopeless cat lady. Being able to share all I know with you is a kind of magic I have never experienced before!
I would like you to know I enjoy and admire your naturalness. I will be subscribing to your you-tube channel. Thank you.
Hi Judith! Thank you so much, I really appreciate that.
Scraps have always made me nervous. You are helping me have fun
I’m so glad to hear that! I’ve felt the same way, I used to throw away bags of them. But now it’s changed and I’m having a blast too!