Today we’re making the the Brick Wall quilt pattern, the quickest (and the most beautiful) patchwork ever! If you blink you’ll miss it. It’s that quick and simple to make.
It is a stunning quilt pattern that you’ll want to make again and again…
AND we’re making it a Mug Rug, which is the quintessential quick, fulfilling, easy sewing project idea for when you’re trying to get your sewing on and don’t have a lot of time.
How to Sew the Brick Wall Quilt Pattern
I have to be honest with you here, this may just be the most awesome sewing project for fabric leftovers I’ve ever made!
And as far as what you need to know to follow this sewing tutorial, I have to say… not much, not much at all!
In order to sew the brick wall quilt pattern you need to know how to cut small rectangles of fabric in two different sizes, some batting rectangles too, then we’ll be making tiny quilt sandwiches and self binding.
That means I’m using the backing fabric to make our binding.
Then we sew all our rectangles together and that’s it!
Oh, and have I mentioned I’m using my awesome scrap pile to do it? I mean, I’m pulling all the stops here guys!
So let’s go ahead and get our leftover scraps because we’re going to need them.
Why the Brick Wall Quilt Block is The Perfect Scrap Busting Project?
Having to come up with all these different scrappy projects for beginners can be a bit of a challenge.
On one hand, I want to be able to use up all the leftover fabric I have lying around. (I have been quilting for over 10 years now so… I have a lot of leftover fabric, especially tiny scraps!!!)
On the other, I want to make simple sewing projects that anyone can make.
Well, making brick quilt blocks will pretty much fit both those wishes. I mean, how hard is it to cut tiny rectangles?
And how likely is it that you’ll have scraps in your leftover fabric stash that can easily be cut into tiny rectangles? It truly is a match made in heaven!

By now you may wondering why I didn’t just sew a couple of rectangles together and called it a brick wall pattern…
Well, you’ll probably be very surprised to hear this but, by adding the mortar to my brick wall quilt pattern, I actually made the whole thing much easier!
Not only is it quicker to sew, it’s also much more beginner-friendly. Let me explain how…
Simple Brick Wall Sewing Pattern for Beginners
As far as sewing projects to use up your leftover fabric go, this one is as easy as it gets because we will be using the Quilt As You Go technique.
If you’re not familiar with it, QAYG means we handle each pillow, each brick, individually.
So, instead of sewing the quilt block top together and then making the quilt sandwich by adding the backing fabric and the batting in the middle, we’re joining the 3 layers at once, from the first moment we sew a rectangle.
One brick at a time.
We use the backing fabric to self bind each rectangle, which saves us the trouble of having to make and add bias tape to the whole thing. So, like I’ve told you, that mortar, our quilt as you go binding, is a really big help!
Quilt as You Go is also very handy when you’re making big pieces, like quilts, on a home sewing machine because instead of having to feed the whole thing through it, you’re working on quilt block at a time.
How perfect is that?
Brick Wall Quilt Block Pattern Supplies
- Several scraps of colorful fabric
- Beige, linnen-like fabric
- 100% cotton batting
- Rotary Cutter
- Rotary Blade
- 12” x 6” Quilting Ruler
- Cutting Mat
- Rotating Cutting Mat (optional)
- Mini Iron
- Ironing Wool Pad
- Quilting Clips
- Basic Sewing supplies: Pins, needles and thread
- Any regular foot (sewing machine)
Disclosure: some links are affiliate links. As an Amazon associate, I earn from qualifying purchases, at no extra cost to you.
Brick Wall Quilt Block Pattern Requirements
This is what you’ll need to create your own Brick Wall Mug Rug using the Quilt As You Go method:
- 9 3″x1.5″ rectangles of colorful fabric
- 9 3″x1.5″ rectangles of 100% cotton batting
- 9 5″x3.5″ rectangles of beige linnen-type fabric
Step 1: Sorting the fabric

Okay, let’s get our scrap pile. I’m looking for some colorful fabrics that work well together.
Remember, we’re making only 9 brick quilt blocks, we don’t have that many chances to make a color statement!
I want this to be nice and colorful, so I need fabrics that contrast nicely with each other.
That means no whites or pastel colors, just pure color for your brick wall.
Step 2: Cutting the bricks

Okay, time to make our quilt pieces. We need 9 of each.
That’s 9 colorful rectangles, 9 batting rectangles and 9 backing fabric rectangles.
For the colorful bricks and the batting, that’s 3″ by 1.5″ and for the backing fabric it’s 5″ by 3.5″.
Quick Tip: If you don’t want to have to measure so many rectangles with your ruler and because we’re using scraps you can’t really cut many at a time, you can create a template using some paper or cardboard and then use it to draw the rectangles you need on the fabric before cutting.
Step 3: Trimming the backing fabric corners

Because we don’t want our brick corners to be bulky, we need to trim off a little bit of the backing fabric.
So we want to take half an inch off diagonally, we just use our angle lines from our quilting ruler to make sure it’s nice and straight and trim of all the 4 corners.
After you’ve cut the first one, just line it up with the others and cut it off quicker, no need to have to measure them one by one.
And, again, you can create a perfect template for this piece as well and just draw on the fabric before cutting.
No extra measuring required!
Step 4: Making the quilt sandwiches

Now that we have all our pieces, it’s time to make our tiny puzzles. Or in this case, our quilt sandwiches.
We’re building one brick with mortar at a time, because we’re quilting as we go.
So we place the backing fabric, right side (if that makes a difference for your print) down. Then add the batting and then the colorful rectangle facing up.
We do this for all our 9 bricks of our mug rug brick wall
Step 5: Pressing the quilt sandwiches

I always advise pressing the quilt sandwich, even if all the pieces are straight or you’ve pressed them beforehand.
This is because pressing the sandwich together helps keep the layers in place, even if you don’t use any kind of adhesive.
That will help keep it nice and stable for our next step.
Step 6: Folding our self-binding

And before we know it, we’re ready to bind our quilt as you go quilt blocks.
That’s what’s so beautiful about this method, by dealing with one quilt block at a time, you get to finish it and have a finished result much quicker.
We want to use the extra backing fabric as a binding, so we just fold the fabric onto our colorful center twice. Once to hide the raw edge of the backing fabric and another fold to cover the raw edge of the colorful rectangle.
You can keep these folds in place by using pins, by pressing them with the iron or by using quilting clips, which is my favorite method because it’s quick and easy to remove when we’re sewing.
Remember to tuck in those corners just like you would a regular quilt, making a mitered corner as you usually would.
Step 7: Binding our bricks

Time to sew that binding in place and quilt our quilt block at the same time.
We’re sewing as close to the binding edge as we possibly can.
You can sew it by hand, using a hidden stitch that catches all three layers.
Step 8: Organizing our Brick Wall Quilt Block Pattern

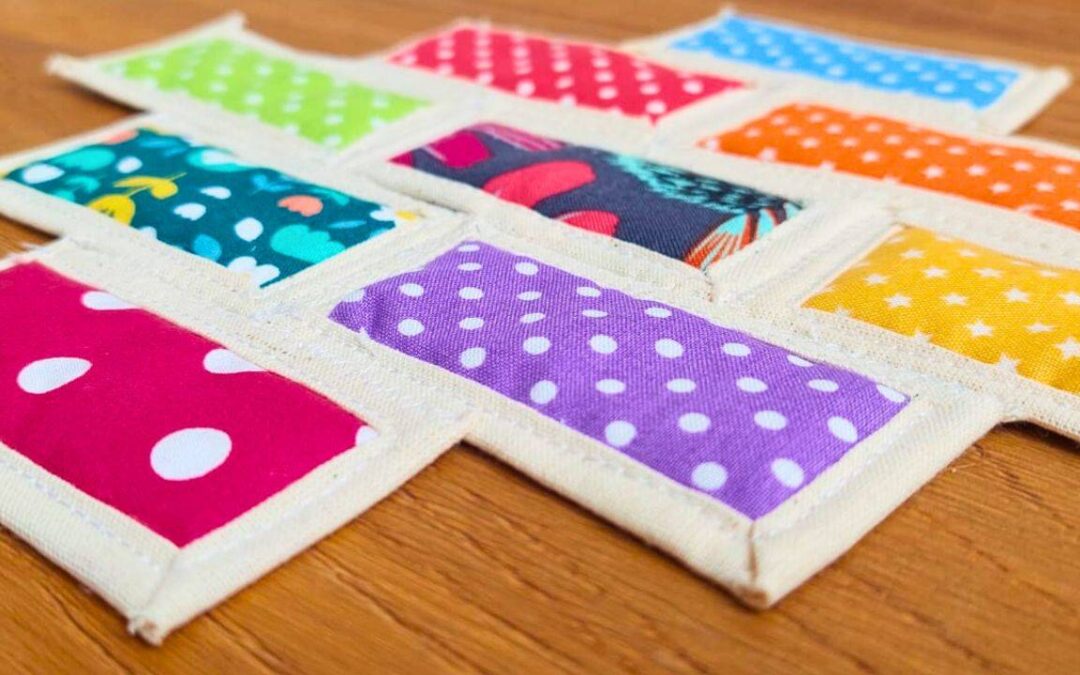
Okay guys, all our little brick quilt blocks are done, time to arrange our brick wall pattern and turn it into a mug rug.
We want to create a diamond shape, if you will, giving it enough space for whatever you’ll want to use it for.
This is were the colors we picked are really imporant, we want those big contrasts for each brick to stand out on its own.
Step 9: Sewing our bricks together

Time to sew the whole thing together!
We’re using a small zig zag stitch. Is subtle and sturdy all at once!
Things to keep in mind: the bricks will probably be a little crooked and that’s okay.
We can easily “force” two bricks together when we’re sewing.
We do not want to overlap the bricks, we want them side by side.
First we sew the rows of 2 and 3 bricks and only after that do we start sewing rows together and creating height.
Step 10: And that’s it!

And here we have it guys! Our very colorful, very original, somewhat crooked mug rug!
As you can see, the zig zag stitch is pretty unnoticeable, even though I used white thread on beige fabric.
We were able to sew all the bricks side by side and make each one of them pop, as promised!
There are no more steps, no pressing or trimming required, you’re good to go!
Watch the full tutorial!
And that’s it guys, the easiest, quicker, funnest quilt block quilting pattern ever!
How awesome was that?
If you want to watch the video of this quilt top getting made, here it is!
Most Recent Projects
Incredibly Easy Stained Glass Quilt Pattern for Beginners
Today I’m making a stained glass quilt top. But...
How to Make 3D Tumbling Quilt Blocks (No Y-Seams)
Today we’re a making tumbling blocks! And that...
5 Practical Ways to Use Ugly Fabrics
Today I’m making a quilt using only ugly fabric....

About Me
I am a content creator, designer and maker of quilts and a hopeless cat lady. Being able to share all I know with you is a kind of magic I have never experienced before!