Today I’m making a Trip Around the World quilt for the very first time.
When you look at it, it looks scary and expert level.
But in fact, it’s actually pretty simple… if you do it the way I’m doing it, of course.
Why shouldn’t we challenge ourselves with something we’ve never tried before, something we wanted to do but never quite had the courage to go ahead and do it?
Now is the time! Let’s go!
What is the Trip Around the World Quilt Pattern
Today we’re making a Trip Around the World quilt and I can’t believe it’s been around since the 1900s and I’ve only just heard of it now!
Now, I know this is similar to a Bargello Quilt and that’s actually how I came to realize this pattern exists, while looking for bargello designs to make with you guys.
But there’s a very important difference between the two.
The Bargello strips have different lengths because you want that flowy feel, like it’s moving.
Here you have squares, simple squares, all in the same size.
And, in a way, I’m hoping that actually helps us understand these kinds of patterns better because we’re not dealing with the different sizes, so it’s much easier this way.
This beginner level quilt pattern is made of colorful blocks that are arranged in a concentric layout, creating the illusion of a globe or map with each row representing a different “stop” on a journey around the world.
How awesome is that?
How to Make the Trip Around the World Quilt Pattern with Jelly Rolls
Now, there are several ways to make a Trip Around the World Quilt Pattern.
You can make a scrappy Trip Around the World quilt, meaning you go to your leftover fabric pile, you pick same width strips and use them to make your pattern.
You can get your favorite fabric yardage and cut off some strips and use them for this quilt tutorial.
Or you can do it the way I did it and use a Jelly roll.

Jelly rolls make our lives easier for several reasons.
Particularly if you’re using gorgeous fabrics like this Kona rainbow set.
For one this, you get a set of 41 fabrics that have been curated to work well together, saving you the time and the trouble of having to match fabrics from your pile.
Also, you know they’ll have the width you need, in this case 2.5 inches wide and that they’ll be pretty long.
In fact, some of the strips in this Jelly roll as as long as 47 inches, which is a lot!
All you need to do when you’re working with a Jelly roll for making a Trip Around the World quilt pattern is pick which strips you want to use and create your sequence using them.
Or just use the whole Jelly roll and get a bigger piece than the one we’re making.
Either way, it’s pretty simple!
Create Your Own Trip Around the World Quilt in a Day
Now, if you want to create your own Trip Around the World Quilt top in a day, the first step is pretty easy: use a Jelly roll and save a lot of trouble cutting strips.
Plus you’ll already know the fabrics work well together and the sequence is on point.
Particularly for this Kona Jelly Roll that actually features one color for each strip instead of having pairs of the same fabric.
Last but certainly not least, when it’s time to sew, chain sew your pieces to make it that much quicker to get your sewing done.
And, of course, just enjoy the process, it’s the best part!
Watching that pattern grow as you add the strips, it’s what quilting is all about and this is the perfect pattern for quilters of all levels.
Trip Around the World Quilt Supplies
- Strips of colorful fabric (I used a Kona Jelly Roll)
- Rotary Cutter
- Rotary Blade
- 24” x 6” Quilting Ruler
- Cutting Mat
- Mini Iron
- Ironing Wool Pad
- Basic Sewing supplies: Pins, needles and thread
Disclosure: some links are affiliate links. As an Amazon associate, I earn from qualifying purchases, at no extra cost to you.
Trip Around the World Quilt Requirements
- 20 2.5×37 inch strips of colorful fabric that works well together (warm and cool colors, I used a Kona Jelly Roll)
Step 1: Selecting the strips

Okay guys, we’ve got our work made so much easier for us because we’re using this Jelly Roll.
All we need is to pick 20 strips from the 41 set.
I want 10 warm and 10 cool, so 10 reds, oranges and yellows and 10 greens, blues, purples and pinks.
Yes, I’m adding the pinks to the colds and maybe some greens to the warms to make an effortless transition.
Step 2: Making the sequence

And now that we have our 15 scraps, we want to create a color sequence we like.
Since I’m trying to make an ombré, I want to go light to darker and then make it really dark in the middle, before I go back to light.
I want to make it clear one more time that you do not need to make an ombré to create a successful Bargello quilt pattern, as long as the colors work with each other, it’s fine.
Step 3: Sewing the strips

Now it’s time to sew and we’re still keeping the warms separated from the cool, so we’ll be swing two sets of 10 strips.
I’m chain sewing here, so first I sew pairs of strips, them I do back and sew pairs together into 4s and then 4s into 8s and then I add the final pair to make the 10.
Step 4: Pressing the strips

Before we continue, let’s press our seams nice and flat.
Now, this is an important step for any sewing project but much more so for this one.
Because in order to cut strips with precision we need those seams not to get in the way.
Step 5: Making 4 pieces

Okay, now is the part where we turn our 2 pieces into 4 by cutting them in half.
We do this because we want to create 4 corners for our quilt so we can work on each one separately.
It makes it easier to cut but also easier to make our Trip Around the World Pattern.
Step 6: Making the tubes

Our next step is to close all 4 pieces into tubes or cylinders by sewing the top and the bottom strips together, just like we’ve done for all the other strips.
Make sure your strips are as straight as possible to make sure you’ll be able to cut those strips without any issues.
Step 7: Cutting the strips

Okay guys, time to cut some strips and, for me, this is the most nerve wrecking part of the whole tutorial.
So what size are the squares for a Trip Around the World quilt?
We cut 2.5 inch strips because our Jelly roll strips were 2.5inch wide.
So, in order to get perfect 2 inch squares once we’re done, that’s what we need.
Step 8: Creating the Trip Around the World Quilt Pattern

Okay guys, time to create our stunning Trip Around the World Quilt Pattern.
And, much like the Bargello Quilt Pattern, we’re looking to create a step ladder.
We start by opening our tube and ripping the seams at the top of the first square of our sequence.
Step 9: Mismatching the squares

Next you grab strip number two and you rip the seams between the first and the second square.
And, as you open the second strip up and lay it on the table, you can see that the entire row of squares has gone down one place.
For the third strip, you rip the seam between the second and the third square.
You see where this is going right?
We just keep adding one more square to create a ladder effect until we’re out of strips.
Look at that guys, this is a quarter of our quilt top right there.
Do this for all the other 3 pieces.
Now, there are a couple of Trip Around the World quilt variations, but we’re keeping it simple this time.
Step 10: Sewing the Pattern

Okay guys, time to sew our strips.
Make sure to nest those seams to keep our quilt top nice and flat.
Sew all 10 rows for each of the 4 pieces.
Step 11: Pressing the Seams

And now, of course we press all the seams nice and flat before the big puzzle time!
Step 12: Combining the pieces

And now it’s time to puzzle.
And before you pick your final layout for your Trip Around the World quilt pattern, why not play with the 4 pieces a little bit.
Make different combinations of the 4 pieces and see what you get.
This is the fun part after all and, after all we’ve done, we deserve it!
Step 13: Sewing the Quilt Around the World Quilt Top

And once we pick our favorite layout, it’s time to sew the 4 pieces together and finish our stunning Trip Around the World quilt top.
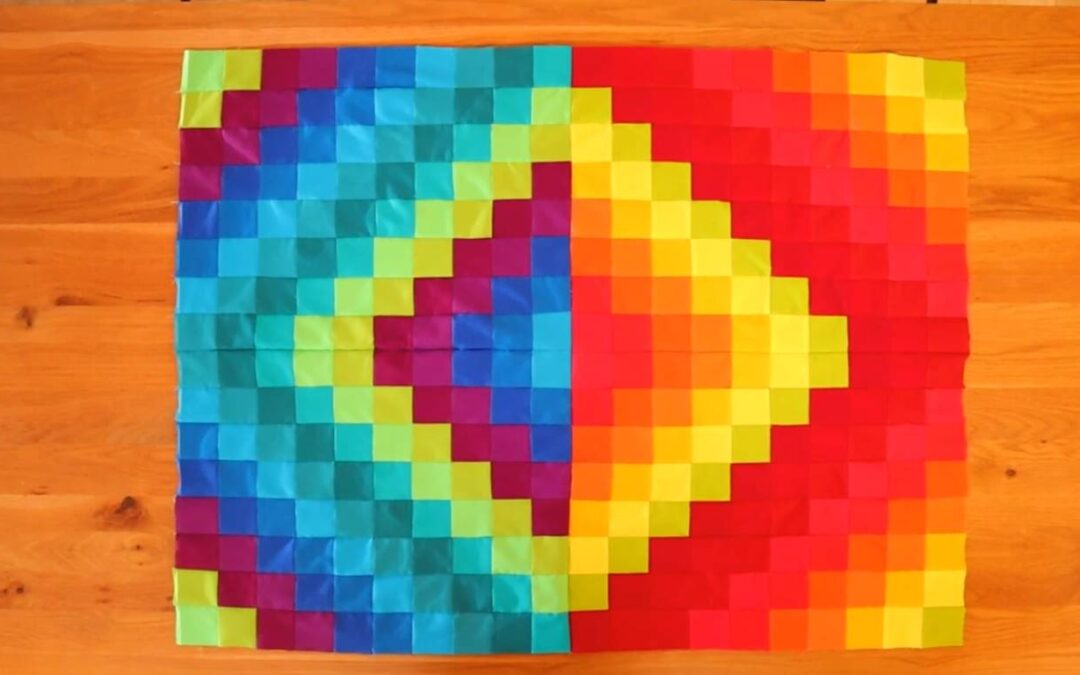
Step 14: And it’s done!

And here it is guys!
Our Trip Around the World Quilt top with so many stops for us to travel to!
It’s colorful, filled with so many of my favorite colors!
I’m telling you, this quilt will put a smile on anyone’s face!
And how easy was it to make?
Watch the full tutorial!
And here we have it, our lovely Trip Around the World quilt pattern.
How simple was that to make? As promised!
And if you want to watch the video of this awesome Trip Around the World quilt pattern getting made, here it is!
Most Recent Projects
Incredibly Easy Stained Glass Quilt Pattern for Beginners
Today I’m making a stained glass quilt top. But...
How to Make 3D Tumbling Quilt Blocks (No Y-Seams)
Today we’re a making tumbling blocks! And that...

5 Practical Ways to Use Ugly Fabrics
Today I’m making a quilt using only ugly fabric....

About Me
I am a content creator, designer and maker of quilts and a hopeless cat lady. Being able to share all I know with you is a kind of magic I have never experienced before!