Guys, today we’re making a watercolor qult pattern.
And it seems I’ve been living under a rock, because I was today years old when I found out about this type of quilt even though it’s been around for ages!
So of course I had to try it…
And of course I had to make it easier than the traditional version.
Also, have I mentioned this is going to be a scrappy project?
It’s going to be the cutest, most awesome free pattern you’ve ever seen!
Let’s go!
What is a Watercolor Quilt?
If you Google watercolor quilting, your mind will be blown.
There are such awesome, artistic watercolor quilts out there!
We won’t be doing anything as complicated as that, we’re keeping it simple today.
Just some fun, colorful quilt as you go that should look like a cute watercolor painting once we’re done with it.
Hopefully!
So what makes a watercolor quilt?
It’s meant to resemble a traditional watercolor painting, with the different values, the ombrés created by the blending of values in our selected fabrics.
We start by adding darker backgrounds that create shadows and add depth and finish with the lighter wash to create a watercolor transparency effect with the fabric.
I’m telling you guys, this one is truly special…
How to Pick Fabric for a Watercolor Quilt
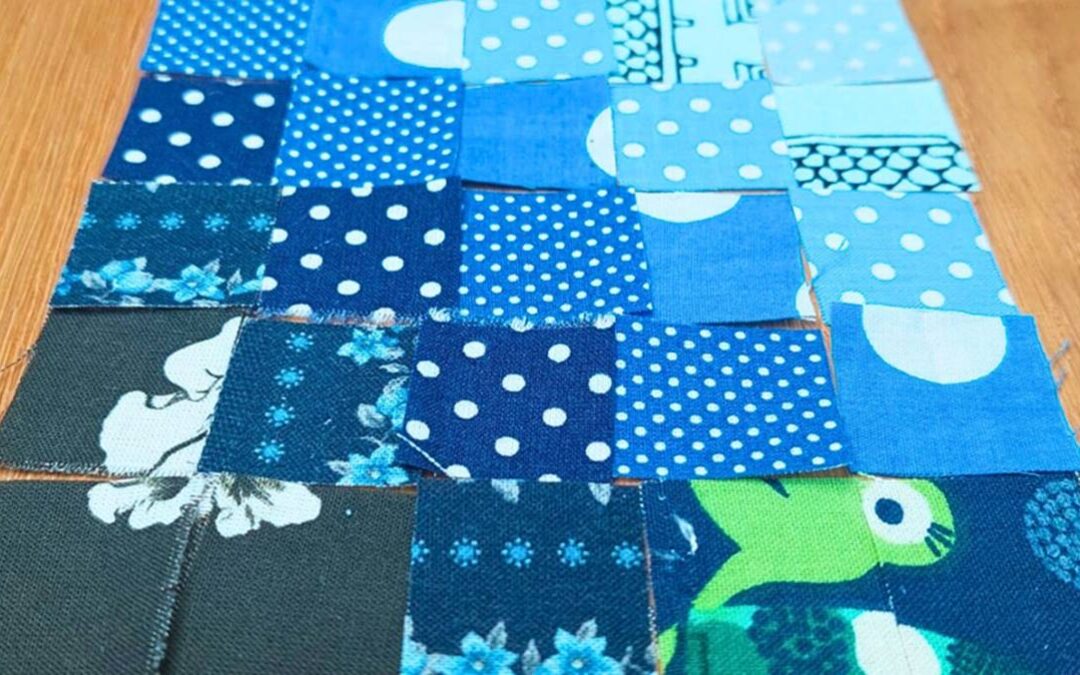
So the first step is creating a blue ombré, which means we start with dark blue and end up with light blue, just like the color wash quilts we’ve done before.
We need 25 squares in all kinds of shades of blue, from dark to light.
And we don’t need to use the same fabric for each color value, ok?
In fact, it will look better if we don’t, but if you don’t have a lot of fabrics within the same color, you can totally use one fabric per value, no problem.
How to Make a Watercolor Quilt Pattern
In order to create a watercolor quilt pattern, we’re essentially doing a color wash quilt.
Meaning we’re creating this blending of values using selected fabrics for that effect.
In this case, we’re starting at one corner with the darker values and slowly work our way up to the lighter values, with loads of medium values in between.

In order to keep the whole color wash from looking to stiff or parallel, I always like to mix fabrics within the same value and stay away from one fabric diagonal strips.
I’m making a sort of a stair pattern if you will, we don’t want straight lines of the same fabric or even the same value, we really want it to look like their naturally mixing and blending together.
Watercolor Quilting Idea: Underwater Scene
Now, a color wash by itself does not a watercolor quilt pattern make.
We need something a little bit more artistic than that.
This is an art quilt after all!
So thinking we want to mimic an impressionistic painting of sorts, we need a front subject… that we will be adding to our quilt top, in black fabric, as is to make is look like it’s in the shadows.
I picked 3 fishes, a fish family if you will. And I will be appliqueing them to this quilt.
And that’s how we get our very original, one of a kind underwater scene!
Watercolor Quilt Supplies
For this free pattern, you’ll need:
- Blue scraps
- Black backing fabric
- 100% Cotton batting
- Rotary Cutter
- Rotary Blade
- 6” x 6” Quilting Ruler
- Cutting Mat (I’m using a rotating cutting mat)
- Mini Iron
- Ironing Wool Pad
- Quilting clips
- Basic Sewing supplies: Pins, safety pins, needles and thread
- Any regular foot
Watercolor Quilt Requirements
- 25 2.5 inch blue squares in different values
- 2 3 x 3 inch black squares
- 1 4 x 4 inch black square
- 1 11 x 11 inch black square
- 1 10 x 10 inch inch batting
Step 1: Picking scraps

First step as always in a scrappy project: find scraps that suit our project.
Which, for our underwater watercolor quilt pattern means blues, in all different shades.
The more the better, we really want to mix those fabrics up.
Step 2: Cutting fabric squares

With only 25 squares, we need to make them all count!
We’re cutting them to 2.5 inches.
We need 6 darker value blues, 9 dark value blues that aren’t as dark as the first ones, 6 medium value blues and 4 light value blues.
This is what I chose to do with my color wash, but just go ahead and change these rations to your own preference.
Step 3: Cutting the batting

And then, of course, we need a 10 by 10 inch square of batting.
Mine is 100% cotton but it’s just because it’s what I have on hand.
You can use whatever your prefer.
Step 4: Cutting the black fabric

And then there’s the black fabric and I used 2 different kinds: one for the backing and one for our fishes.
For the backing we need an 11 by 11 inch square, because we’re doing self binding in the end.
For the fishes, we need a 4 inch square for daddy shark and 2 3 inch squares for mommy and baby sharks.
And now you’re stuck with that song all day long.
Welcome to my world!
Step 5: Making the color wash

Next step is creating our color wash.
Time to blend these fabrics as naturally as we possibly can, considering we’re using only 25 squares for the desired effect.
We start dark in the bottom left corner and work our way up to our top right corner, where it will be the lightest.
Step 6: Sewing the square rows

Time to sew!
There are a couple of ways we could do this. Get some thermal adhesive underneath, place them all next to each other, then iron them in place and zig zag quilt them and that’s it.
If we were to quilt as you go each piece, the rows would be pretty easy, it’s when we went to sew the rows together that we would have a problem.
We’d have to sew the batting together and create a lot of bulk, not to mention we wouldn’t be able to have the backing fabric at this point.
At the same time, doing a traditional top and then just making the quilt sandwich doesn’t make much sense because I wasn’t planning on quilting this, so it would be pretty loose.
Well, I’m making a mixed version, really. I’m going to sew all the rows, the traditional way….
Step 7: Pressing the fabric rows

Now that we’ve got our 5 rows, it’s time to press them.
We really need the seams for each row to point in different directions to make sure that, when it’s time to quilt as you go, we’ll get nested seams without having to work hard for it.
We want this nice and flat and nested seams is the only way we’ll be able to do it.
Step 8: Quilt as you go

Time to Quilt as You Go!
We get our backing fabric and our batting and center both layers.
Then we add the first two bottom rows, right sides together and sew. Be careful to leave a small margin on the sides and the bottom of the rows.
If we pressed our seams right, they should lay nice and flat.
Then we add the third strip to the second, right sides together, and sew again.
Press between layers if needed.
Repeat until you’ve got the full 5 rows sewn into your quilt sandwich.
Step 9: Cutting the fishes

Now it’s time to create our fishes.
Practice on a piece of paper if needed or just go ahead and draw some simple fishes onto the back of the black squares.
A bigger one (daddy shark), a medium-sized one (mummy shark) and a smaller one (baby shark).
Than cut them and you’re ready to go!
Step 10: Appliqueing the fishes

Now let’s go ahead and appliqué these fishes. You can add some thermal adhesive and glue them on.
Then you can leave them be or use a straight stitch, a zigzag stitch or an applique stitch.
I’m appliqueing our fish family into our watercolor quilt.
But guys, I mean it, if your machine doesn’t do appliquè, a zigzag will work very well. You can also hand sew it, of course, that way you’ll hide those stitches.
Step 11: Doing the self binding

Okay guys, what’s left?
We need to self-bind, of course!
We just fold the backing fabric onto our top. Fold once to hide the raw seams and twice to make our nice, thin binding.
We don’t need a thick one, this black is really striking.
It’s really dramatic, isn’t it?
After we’ve clipped our binding in place, it’s time to sew!
We need to stitch as close to the inside edge as we possibly can.
Step 12: And that’s it!

And here we have it, our very own watercolor quilt pattern.
How awesome is this?
I can honestly say this is the cutest thing I’ve ever done!
This one is going on my sewing corner walls, that’s for sure!
As far as I’m concerned, it’s absolutely perfect!
Watch the Full Tutorial!
And that’s it guys, the cutest, most awesome quilt pattern I didn’t even know existed is ready.
Fun to make and so easy! And look at this underwater scene, how perfect is this?
If you want to watch the video of this quilt pattern getting made, here it is!
Most Recent Projects
Incredibly Easy Stained Glass Quilt Pattern for Beginners
Today I’m making a stained glass quilt top. But...
How to Make 3D Tumbling Quilt Blocks (No Y-Seams)
Today we’re a making tumbling blocks! And that...

5 Practical Ways to Use Ugly Fabrics
Today I’m making a quilt using only ugly fabric....

About Me
I am a content creator, designer and maker of quilts and a hopeless cat lady. Being able to share all I know with you is a kind of magic I have never experienced before!