Today we’re deciding what to do with small fabric scraps.
I’m taking so many of your favorites for this project I don’t really even know which to mention first.
It’s got loads of scraps, of course, it’s a scrap fabric project through and through.
Quilt as you Go, my all time favorite and in the end we make something out of it that is useful, cute and the perfect gift.
It’s also quick, easy and a lot of fun to make!
You know it’s going to be good right?
Let’s do it!
What to Make With Fabric Scraps
We all have a leftover fabric stash hidden somewhere where we don’t have to think about it much.
Because odds are, if we’re doing patchwork, there’s going to be fabric trimmings once we’re done.
Luckily, there are a lot of things we can make with scrappy fabric, in fact, I would say anything you make with regular fabric, you can use your leftover scraps for.
It all comes down to what technique to use for this.
Today we’re doing Quilt as You Go.
How to Use Leftover Scraps That Are Too Small
Can small scraps of fabric be recycled?
If for many people it’s hard to put leftover fabric scraps to go use, it can be even harder when it’s teeny tiny scraps of fabric.
We call this fabric trimmings or fabric crumbs.
For one thing, any time we sew, we need a good seam allowance to make sure the project is sturdy enough to last.
So, if the scrap of fabric is too small, once you sew, there’s nothing left!

A great, practical way to use fabric scraps is using the crazy quilt pattern combined with quilt as you go.
Because, for one thing, a crazy quilt block pattern does not require perfect shapes, any shape can work with this quilt pattern, which makes it perfect to use with tiny scraps of fabric.
Also, because you quilt as you go (meaning you’re quilting your quilt sandwich as you’re sewing the pieces together instead of making a top first and then making the quilt sandwich), you get a much more stable patchwork of fabrics, with less probability of tears of frays.
So yeah, every time I want to use the tiny pieces in my scrap stash, this is my winning combination.
Scrap Fabric Project Idea: Easy Fabric Bowl
I love decorating my sewing space with things I sew myself.
I particularly love using fabric scraps to make the pieces I need for that space.
Fabric scraps hold memories in them, as far as I’m concerned.
These are leftover fabrics from projects I’ve done over time, some that have a very special meaning for me.
So, to be able to look as those scraps as I work or get inspired is very special.
That’s why, when I decided I needed some baskets for my supplies, the decision was simple: I needed to make scrappy fabric bowls.
Scrap Fabric Bowl Supplies
- Scraps of colorful fabric
- fabric for the inside of the bowl
- 100% cotton batting
- 100% cotton ribbon
- Rotary Cutter
- Rotary Blade
- 12” x 6” Quilting Ruler
- Cutting Mat
- Mini Iron
- Ironing Wool Pad
- Basic Sewing supplies: Pins, needles and thread
Disclosure: some links are affiliate links. As an Amazon associate, I earn from qualifying purchases, at no extra cost to you.
Scrap Fabric Bowl Requirements
- 6×10 inch batting rectangle
- 6×10 inch inside fabric rectangle
- colorful scraps of fabric
- 100% cotton ribbon
Step 1: Cutting the batting

Let’s make a 6 by 10 inch batting rectangle.
I’m using 100% cotton because that’s what I have here, but you can use any kind of batting or interfacing you prefer.
This is the basis for our Quilt as You Go, we won’t be adding a backing fabric at this point because we want to be able to hide all our seams.
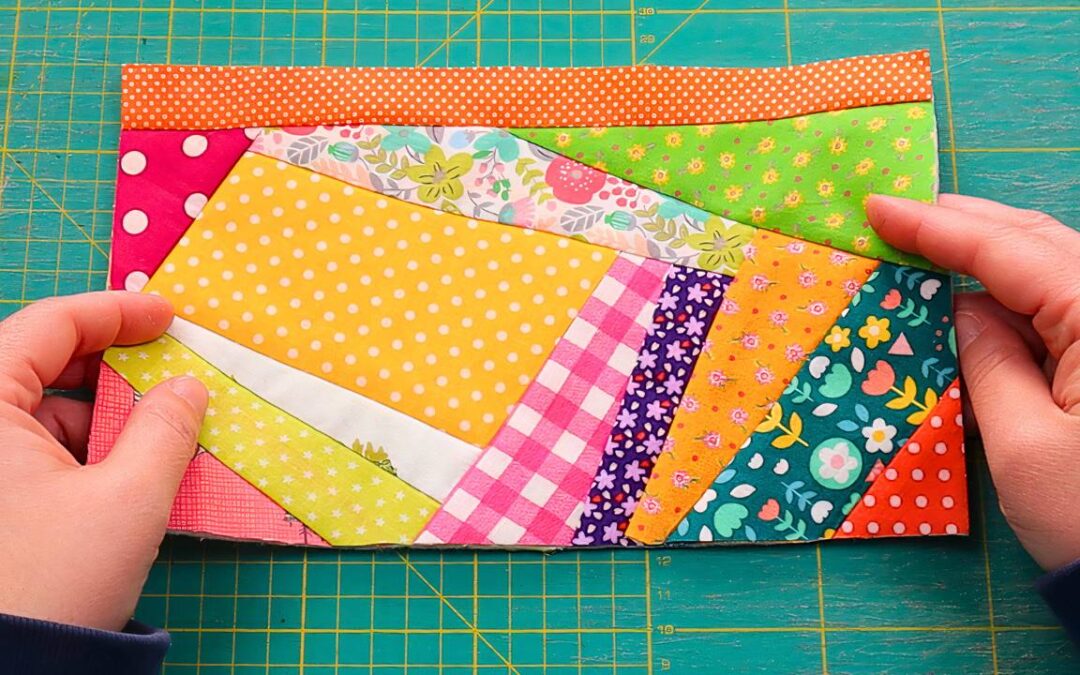
Step 2: Picking the scraps

And now we need our scraps.
We’ll go from small to larger with our fabric scraps to make life easier for ourselves.
We want each piece we add to be able to cover the entire margin of the fabrics that are already there and that’s how we do it easily.
Step 3: Using Quilt as You Go

Okay guys, so what do we do with our fabric scraps?
We start by picking two different pieces of leftover fabric and we place them one on top of the other, right sides together.
We don’t need to overlap them perfectly, we can place the second fabric a little bit to one side to create whatever shape we want.
Once we’re happy with our two fabrics, we pin them.
And then we just keep at it until we cover the entire batting rectangle.
You can trim the excess fabric as you so or just overlap it with a new layer and be done.
Once the batting is covered, you can still add more fabrics to the corners or the borders to create more contrasts and cuter shapes.
This is your project, you can do whatever you want, as long as once you’re done, there aren’t any raw edges showing inside the rectangle.
Step 4: Sewing the scraps

Nothing to it, we just need to sew by the edge of the top fabric.
I’m using a very regular foot here, no need for a 1/4 inch guide foot like I usually use.
In fact, I don’t recommend using that guide because it will get caught on the batting and make life harder for yourself.
Step 5: Pressing the quilt sandwich

As far as the pressing goes, I always like to press as I go, meaning as I add the fabric scraps, I press them nicely in place to make sure everything is nice and flat.
And then, once the rectangle is completely covered, I press one last time to make sure everything is in place and the batting rectangle is, indeed, completely covered.
Pressing is also very important for the trimming, the flatter the fabrics the easier trimming will be.-
Step 6: Trimming the quilt sandwich

And that’s actually our next step, trimming all the excess scraps (more scraps to use for other projects yay!).
By the time we’re done with our trimming we’ll have a 6 by 10 inch rectangle of batting in the back and cute, colorful fabric scraps at the top.
Step 7: Folding the quilt sandwich in half

Okay guys, time for our fabric basket or our fabric bowl.
We start by folding our rectangle in half by the longer side.
Once we’ve folded the rectangle perfectly, we pin it.
Step 8: Sewing both sides

Now we sew both sides of our folded rectangle shut.
By the time we’re done sewing we’ll have a sort of a quilted pouch with only one opening.
Step 9: Cutting the corners

Now we want to create some depth for our basket.
We draw a 1 inch square on both bottom corners.
Yes, the corners on the sides we’ve just sewn.
And then we cut both 1 inch squares off.
Step 10: Sewing the corners shut

And now it’s time to close the corners we’ve just cut.
We take the squares and flatten them, making sure the seam is in the middle.
And then we sew a straight line.
We do this for both corners.
And the outside of our basket or fabric bowl is complete.
Step 11: Repeat steps 7 to 10

Okay guys, time to take care of our inside fabric.
We pick a colorful fabric and then cut a 6 by 10 inch rectangle.
Next step is repeating all the steps we just took for our outside fabric, from 7 to 10.
Step 12: Join both pieces

Time to join both pieces.
The outside bowl and the inside bowl.
We do this by joining them, back sides together, meaning we want them to be placed exactly as we want them in our final version of the bowl.
Step 13: Add the top ribbon

Because we are adding a ribbon to the top of this bowl.
Let’s start by turning our bowl inside out.
Then we take our ribbon and add it to the top of the bowl, pinning it to all the layers.
Step 14: Sew the top ribbon

Now we sew the ribbon in place, as close to the edge as we possibly can.
To close the ribbon loop, we fold the top end of the ribbon in and sew over it.
Step 15: Add the ribbon to the outside layer

Okay guys, time to turn our bowl inside out and fold our ribbon over to the outside of our fabric bowl.
We also want to add a small hook made with the same ribbon, because we’ll want this bowl to be hangable.
We pin everything in place and we sew… carefully.
And, just like we did when we added the ribbon to the inside fabric, we want to fold the end of the ribbon in and sew over it on the outside as well.
Step 16: And it’s done!

And here we have it guys, our cute, colorful fabric bowl is done and ready to be put to very good use.
I’m adding it to my tool board and I’m using it to store brushes.
Maybe I’ll make a new one for my quilting clips.
These scrappy bowls are so practical and easy to use and, unlike the metal versions, can be easily washable.
Watch the full tutorial!
And here we have it, a very practical and cute fabric bowl.
Ready to be put to very good use!
My sewing space is getting closer to being done and I’m loving it.
And if you want to watch the video of this scrappy fabric bowl getting made, here it is!
Most Recent Projects
Incredibly Easy Stained Glass Quilt Pattern for Beginners
Today I’m making a stained glass quilt top. But...
How to Make 3D Tumbling Quilt Blocks (No Y-Seams)
Today we’re a making tumbling blocks! And that...
5 Practical Ways to Use Ugly Fabrics
Today I’m making a quilt using only ugly fabric....

About Me
I am a content creator, designer and maker of quilts and a hopeless cat lady. Being able to share all I know with you is a kind of magic I have never experienced before!